MSI Afterburner vs RivaTuner: Best Overclocking Software for Gaming PCs
MSI Afterburner vs RivaTuner: Best Overclocking Software for Gaming PCs
Getting the best overclocking software for a gaming PC comes down to pairing two tools that do different jobs flawlessly. MSI Afterburner is the control center for GPU tuning—clock/voltage sliders, fan curves, hardware monitoring, and profiles—while RivaTuner Statistics Server (RTSS) injects an in‑game FPS overlay with frametime graphs so you can validate gains without tabbing out. Together, they deliver the right blend of performance, visibility, and repeatability. Afterburner works across GPU brands and remains free and widely adopted by enthusiasts and reviewers. For most gamers, the smartest move is simple—and it’s the approach we recommend at Gaming Device Advisor: overclock and monitor with Afterburner, then measure and diagnose with RTSS using its FPS overlay, frame time graph, and benchmark logging.
Summary and recommendation
Bottom line from Gaming Device Advisor: use both. MSI Afterburner is the overclocking and monitoring GUI; RivaTuner Statistics Server powers the in‑game OSD (On‑Screen Display) and frametime overlay. They’re bundled and intended to work together for GPU tuning and real‑time metrics, as outlined in MSI’s Afterburner OSD guide (which also covers profile‑driven, on‑screen metrics) MSI’s Afterburner OSD guide. Afterburner works across GPU brands and remains free and broadly used for benchmarking and tuning by the enthusiast press and communities cross‑vendor and reviewer adoption. Our recommendation: use Afterburner for overclocking, fan curves, and monitoring; use RTSS for a precise FPS overlay, frametime graphs, and Benchmark Mode to validate min/avg/max improvements overview: use Afterburner + RTSS together.
Keywords to know as you go: GPU tuning, FPS overlay, frame time graph, 1% lows, benchmarking tools.
How we evaluate overclocking tools
At Gaming Device Advisor, we judge tools by what actually improves playability and holds up across games:
- Stability and compatibility (including anti‑cheat behavior)
- Control depth (core/memory/voltage, fan curves)
- OSD/telemetry quality and customization
- Ease of setup and learning curve
- Documentation, update cadence, and community support
We measure outcomes by sustained FPS uplift, stronger 1% lows, stable thermals under load, quieter acoustics at target performance, and repeatability across multiple runs.
Definition (OSD): An On‑Screen Display is a lightweight overlay injected into games showing real‑time stats like FPS, frame time, temperatures, and utilization, enabling in‑the‑moment tuning and diagnostics without leaving the game.
Tool fit at a glance:
| Criteria | MSI Afterburner | RivaTuner Statistics Server (RTSS) | Notes |
|---|---|---|---|
| Stability/compatibility | Excellent with current drivers | Excellent, but overlay hooks depend on game/anti‑cheat | Some titles require disabling overlays |
| Control depth | Core/mem/voltage, fan curves, profiles | OSD injection, limits, frametime, benchmark | RTSS required for in‑game OSD/frametime |
| Telemetry quality | Detailed sensors/graphs | Renders sensors as text/graphs in‑game | Afterburner feeds RTSS |
| Ease of setup | Simple; bundled RTSS installer | Simple when installed alongside | Install RTSS during Afterburner setup |
| Community/docs | Large, long‑running | Large, active | Abundant guides and forums |
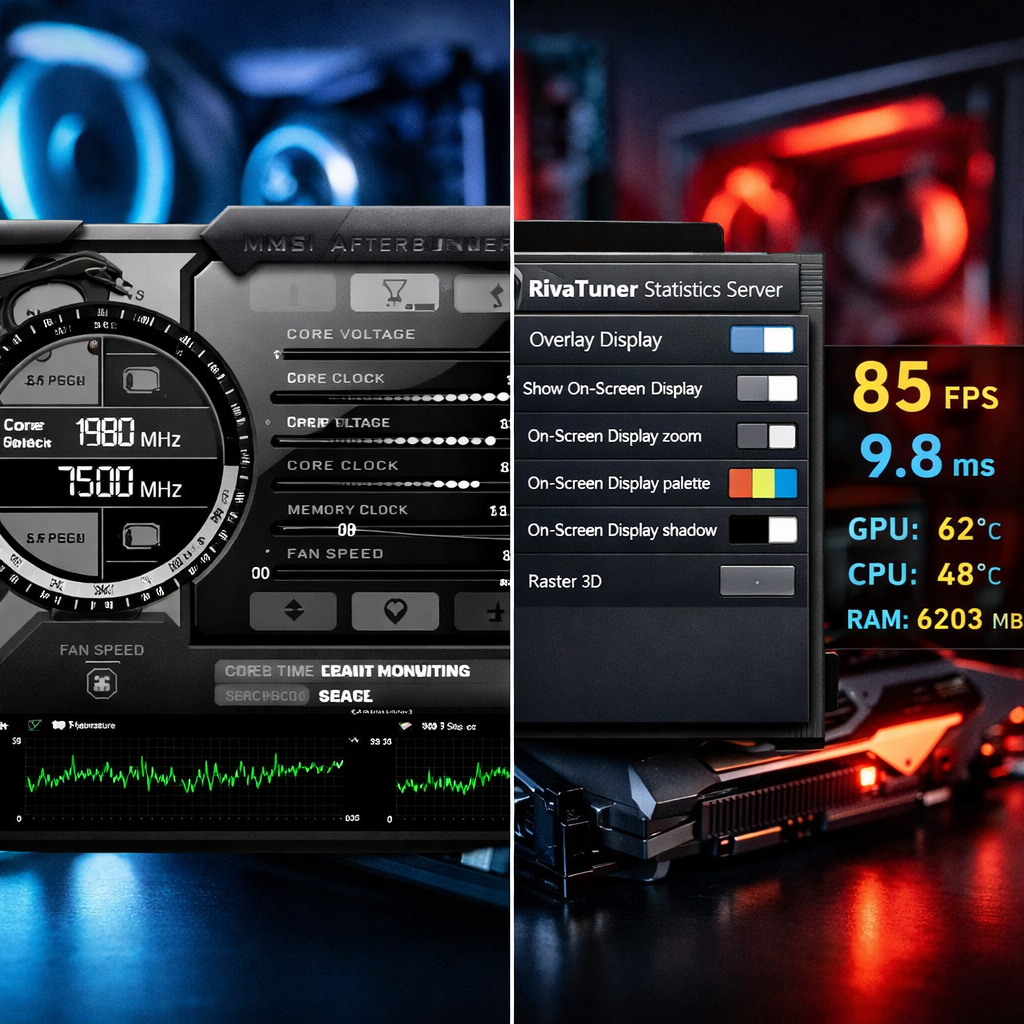
What MSI Afterburner does
Afterburner is your primary GPU overclocking tool. It provides sliders for core and memory clocks, voltage controls on supported cards, per‑profile fan curves, and persistent profiles that you can swap per game or ambient. Its hardware monitoring panes track GPU usage, core clock, temperature, power, and framerate as text or graphs—and those sensors can be shown in‑game via RTSS, as detailed in MSI’s OSD guide (including capture options and graph visibility). Afterburner also includes lightweight video/audio capture so you can standardize or document test runs. Crucially, it works with any major GPU brand and is a mainstay in reviewer workflows, making it a reliable baseline for cross‑vendor testing cross‑vendor and reviewer adoption.
What RivaTuner Statistics Server does
RTSS is the overlay/injection and frametime server that turns Afterburner’s telemetry into actionable, in‑game visibility. It’s bundled with Afterburner and required to display an FPS overlay, with sizing, position, visibility, and graph rendering controlled from RTSS. During setup, you should install RTSS alongside Afterburner to enable in‑game metrics Micro Center’s step-by-step setup. The OSD supports zoom scaling, corner placement, drag‑to‑reposition, display fill/shadow for contrast, custom color/font, and frametime graphing for stutter diagnosis. Its Benchmark Mode captures min/avg/max FPS reliably, making it useful even if you’re not changing Afterburner settings—an approach echoed by enthusiast communities community consensus on RTSS overlays.
Definition (Frame time): Frame time is the time to render a single frame, typically in milliseconds. Lower and more consistent frame times reduce stutter and improve perceived smoothness, often predicting playability better than average FPS.
Feature comparison criteria
Here’s how the tools divide responsibilities in practice:
| Capability | MSI Afterburner | RTSS |
|---|---|---|
| GPU overclocking (core/memory) | Yes | No |
| Voltage control (supported GPUs) | Yes | No |
| Fan curves and thermal targets | Yes | No |
| OSD configuration and injection | Feeds sensors | Yes (zoom, position, fill/shadow, fonts) |
| Frame time graph | Provides data | Yes (renders in OSD) |
| Benchmark mode (min/avg/max FPS) | No | Yes |
| Capture/recording (video/audio) | Yes | No |
| Profile management (OC/fans) | Yes | No |
| Cross‑GPU support | Yes | N/A (overlay only) |
| Anti‑cheat considerations | Low risk | Hooks can be blocked—toggle per‑game |
| Note: Keep GPU drivers and Afterburner updated for best compatibility and new GPU support (MSI’s OSD guide highlights version alignment). |
Overclocking controls and profiles
- Start conservatively. Add small core and memory offsets, then test stability while watching OSD metrics for errors, artifacts, or clock fluctuations.
- Use Afterburner profiles to save “quiet,” “balanced,” and “performance” presets per game or ambient temperature.
- Validate scaling: monitor GPU usage and core clock together—if clocks drop or usage is low, you may be power/thermal or CPU‑bound.
- A/B test changes using RTSS’s min/avg/max readouts in controlled runs to confirm real, repeatable gains.
On-screen display and metrics visibility
Enable the right stats so bottlenecks are obvious:
- Show Framerate as text and graph, plus GPU usage, core clock, temperature, VRAM, and CPU usage to separate GPU vs CPU limits.
- In RTSS, adjust Zoom for size, use Display Fill or Shadow for contrast, choose a corner, and drag to avoid HUD conflicts. Customize colors and fonts for readability on bright scenes RTSS OSD customization and frametime tips.
- Reorder OSD entries from the preview:
- Open the OSD preview window.
- Ctrl+Shift to multi‑select metrics.
- Drag to reorder; release to apply.
Frame time analysis and benchmarking
- Create a frame time graph to assess stability and 1% lows. Remember that higher FPS compresses time per frame, so the graph scrolls faster—judge variance relative to FPS.
- Enable RTSS Benchmark Mode and log min/avg/max FPS during fixed, repeatable runs (same scene, camera path, and duration) for apples‑to‑apples comparisons RTSS Benchmark Mode tutorial.
- If frametime variance persists, try RTSS’s FPS limiter to improve frame pacing; often a slightly lower, capped FPS with tighter frame times feels smoother than an uncapped, spiky average.
Definition (1% lows): The average of the slowest 1% of frames. It highlights stutter and worst‑case performance and often correlates more with playability than peak FPS.
Fan control, thermals, and acoustics
- Edit the GPU fan curve in Afterburner by moving points on the RPM/temperature graph to reach thermal equilibrium that sustains your target boost while keeping noise in check.
- Test multiple curves—quiet, balanced, performance—in the same ambient room conditions. Track temperature, frequency stability, and fan RPM.
- Use the OSD for temperature, GPU usage, and clock graphs to confirm you’re not thermal throttling and that acoustics remain acceptable during long sessions.
Stability, compatibility, and anti-cheat considerations
- RTSS hooks the graphics pipeline to draw the overlay; some anti‑cheat systems or games may block overlays. If a game is sensitive, disable the OSD for that title.
- Fixes for crashes or input issues: add an RTSS injection delay (e.g., 30000–60000 ms), restart the game so hooks re‑initialize, or toggle the overlay off per profile (steps are covered in Micro Center’s setup guide).
- Keep GPU drivers and Afterburner current to maintain compatibility with new APIs and GPUs (as MSI’s documentation recommends).
Setup and ease of use
- Install Afterburner and choose to install RTSS when prompted; this enables the in‑game OSD. If Afterburner was already running, disable “Start with Windows,” exit, install RTSS, then relaunch (outlined in Micro Center’s guide).
- The installer may add missing DirectX libraries. Some apps need to be closed/reopened for hooks to report data.
- Quick start checklist:
- Update GPU drivers
- Install Afterburner + RTSS
- Enable OSD and show Framerate (text, graph)
- Set an initial, moderate fan curve
- Test a known game scene to establish baselines
Performance tuning workflow we recommend
This is the simple, repeatable workflow we use at Gaming Device Advisor.
- Baseline: Run a 60–120 second pass with RTSS Benchmark Mode on and the frametime graph visible.
- Core offset: Increase in small steps; validate for artifacts or crashes.
- Memory offset: Repeat; watch for shimmering or texture errors.
- Thermals: Adjust the fan curve to hold steady clocks under sustained load.
- Retest: Log min/avg/max FPS and inspect frametime variance; compare to baseline.
- Finalize: Save per‑game profiles; if variance persists, consider an FPS cap for smoother 1% lows.
If instability appears, roll back 10–20 MHz and retest.
Pricing, support, and community resources
Both tools are free and widely used by enthusiasts, reviewers, and guide authors. For visual, step‑by‑step help, lean on MSI’s OSD guide and Micro Center’s setup walkthrough; for hands‑on learning, tutorial videos cover OSD customization, frametime graphs, and Benchmark Mode in depth (we cited representative examples above).
Who should use MSI Afterburner
- Gamers who want granular GPU overclocking, voltage and fan‑curve control, capture options, and profile management that travel across different GPUs and games.
- Users prioritizing cross‑vendor compatibility with comprehensive monitoring to validate frequency and thermal behavior during real gameplay.
- Creators/testers who benefit from built‑in video/audio capture to document benchmark runs.
Who should use RivaTuner Statistics Server
- Players who need a clean, customizable FPS counter overlay with text + graph modes, frametime analysis, and unobtrusive zoom/position controls.
- Testers diagnosing stutter, measuring 1% lows, and capturing min/avg/max results via Benchmark Mode for consistent A/B comparisons.
- Anyone who wants reliable in‑game metrics—even without changing overclock settings—thanks to its lightweight, robust overlay engine.
When to use both together
Always pair them when you’re overclocking or troubleshooting. Afterburner’s sensors feed RTSS’s OSD so you can watch FPS, frametime, temperatures, and clocks in real time. Example loops: raise core clock and observe frametime smoothness and temps; tweak the fan curve, confirm thermal headroom and noise; apply an RTSS FPS cap to reduce variance while keeping clocks stable. This combo is the practical standard for reviewers and gamers benchmarking gaming PCs. It’s also our default recommendation at Gaming Device Advisor.
Alternatives and when they make sense
Vendor utilities (e.g., basic overclock sliders or lighter overlays) can be fine for warranty‑safe tweaks or minimal HUDs, but they typically lack RTSS’s robust frametime graphing and Benchmark Mode. Stick with Afterburner + RTSS when you want granular OSD control, accurate 1% lows, and repeatable benchmarking across GPUs and games. Consider built‑in FPS limiters only if you don’t need deep telemetry.
Frequently asked questions
Is MSI Afterburner safe to use for GPU overclocking?
Yes—used widely and safely when you make small, incremental changes and test stability. At Gaming Device Advisor, we also recommend keeping GPU drivers and Afterburner updated.
Why do I need RivaTuner if I already have MSI Afterburner?
RTSS powers the in‑game OSD and frametime graphs so you can see FPS, temps, and stability while playing. At Gaming Device Advisor, we pair it with Afterburner to make changes visible and measurable in real time.
How do I capture 1% lows and frame time data accurately?
Enable a frametime graph and use RTSS Benchmark Mode to log min/avg/max during repeatable runs. At Gaming Device Advisor, we compare before/after to confirm reduced variance and improved 1% lows.
What should I do if the overlay causes crashes or input issues?
Set an injection delay in RTSS, restart the game, or disable the overlay for anti‑cheat‑sensitive titles. At Gaming Device Advisor, we find updating GPU drivers and both tools often resolves hook conflicts.
Can these tools reduce stutter without overclocking?
Yes—use RTSS to cap FPS and improve frame pacing. Gaming Device Advisor recommends verifying smoother frametime plots in the OSD even with stock clocks.