Workstation Meets Gaming: The Ultimate Do‑Everything PC Build Blueprint
Workstation Meets Gaming: The Ultimate Do‑Everything PC Build Blueprint
A single tower can now crunch timelines, render frames, and still drive high‑refresh gaming without drama. This blueprint spells out a balanced, quiet, and upgradable hybrid workstation gaming PC—Gaming Device Advisor’s “buy once, wire once” approach—for students, remote pros, and creators who want maximum utility with minimal tinkering. We anchor parts around modern connector standards, right‑sized cooling, and clean cable routing, so you can build confidently and upgrade surgically later. Expect a practical path to 1440p/240Hz or 4K/120Hz gaming, plus the compute support your apps need. Work fast. Play faster. It reflects Gaming Device Advisor’s practical, upgrade‑ready methodology.
Who this build is for
If you want one machine to handle creative workloads by day and high‑refresh gaming by night, this is the fit. It’s the ultimate gaming PC for overall use when you also export, encode, or render. If that describes your needs, Gaming Device Advisor’s blueprint trims guesswork while keeping flexibility.
Audience snapshots:
- Students and freelancers who render or export occasionally, then game nightly.
- Remote workers who need quiet thermals for calls and weekend AAA sessions.
- Creators who rely on CUDA/OpenCL and need enough VRAM for big scenes.
A do‑everything PC build earns its keep for years; workstation‑class rigs are commonly relied on for 4–6 years, so durability and upgradability matter from day one (see the perspective in PixPro’s workstation overview). Workstation longevity context.
Core principles for a do‑everything PC
Definition (about 45 words): A do‑everything PC balances multi‑core throughput for rendering and exports with high single‑thread speed for snappy apps and high‑FPS gaming. It pairs a gaming‑class GPU that supports creator APIs (CUDA/OpenCL/Vulkan), right‑sized memory and storage, strong airflow, and future‑proof connectors to minimize rebuilds.
The balance: you want plenty of cores for encodes and renders, but not at the cost of gaming responsiveness. Prioritize motherboards, PSUs, and cases that favor modular, upgradable design and future‑proof connectors—a rising trend that reduces full rebuilds later (see Framework’s upgradability ethos). Modularity trend.
Non‑negotiables:
- Socket/chipset compatibility and readiness for ATX 3.1/PCIe 5.x GPUs.
- 32–64GB DDR5, a fast NVMe primary drive, and quiet cooling.
- Clean cable routing, accessible front/rear ports, and a sane, minimal software stack.
Platform choice and upgrade path
Two practical routes cover most hybrid needs and align with Gaming Device Advisor’s recommendations:
- AMD route: Ryzen 9 7950X on an AM5 X670 board delivers high core counts and strong single‑thread for many creator apps and games, without overpaying for halo motherboards. Workstation guidance.
- Intel route: Core i7‑13700 on LGA1700 with a value‑focused B760 board is a smart price‑to‑performance pairing for mixed workloads. Workstation guidance.
Socket/chipset compatibility (about 45 words): The socket is the physical CPU interface; the chipset governs I/O like PCIe lanes, USB, and storage. Matching a CPU to its socket and a feature‑appropriate chipset ensures everything fits and that you get the PCIe versions, ports, and bandwidth your workloads demand.
AM5 X670 vs LGA1700 B760 at a glance:
| Feature | AM5 X670 | LGA1700 B760 |
|---|---|---|
| PCIe version (typical) | PCIe 5.0 for M.2, PCIe 4.0/5.0 for GPU (board‑dependent) | PCIe 4.0 GPU, PCIe 4.0 M.2 (select boards may offer PCIe 5.0 M.2) |
| Typical lane/USB mix | Higher total PCIe/USB count, more high‑speed ports | Mid‑range lanes/ports, enough for 1–2 NVMe and add‑ins |
| DDR5 support | DDR5 only (EXPO/XMP) | DDR5 or DDR4 variants (check board) |
| Upgrade outlook | Ongoing AM5 support and future CPUs expected | Mature socket, limited further CPU upgrades |
CPU selection for cores and single‑thread speed
For render‑heavy users, CPUs like Ryzen 9 7950X on X670 shine thanks to high core counts, while still offering the single‑thread speed many creative tools and games prefer. On Intel, the Core i7‑13700 paired with B760 is a balanced, cost‑efficient match for hybrid loads. Workstation guidance.
Single‑thread vs multi‑core (about 45 words): Single‑thread performance is how fast one core completes tasks—crucial for many game engines and lightly threaded creative tools. Multi‑core performance spreads work across many cores, accelerating rendering, encoding, and simulations. The best hybrid builds combine high boost clocks with enough total cores for parallel tasks.
Sanity‑check choices against current CPU/GPU rankings and real‑world build lists using Tom’s Hardware’s best‑builds reference. Build validation.
GPU selection for gaming and compute
Pick a GPU that hits your gaming resolution target and accelerates your apps. Gaming Device Advisor prioritizes VRAM headroom for creator workloads.
Compute API support matters: NVIDIA cards bring CUDA/OptiX for many renderers; AMD excels in OpenCL/Vulkan and strong rasterization. Ensure enough VRAM for large scenes, textures, and AI models. For rendering workflows, confirm your software’s acceleration matrix. Rendering guidance.
Definition (about 45 words): CUDA and OptiX are NVIDIA frameworks that speed up rendering, AI, and ray tracing in many pro apps. OpenCL and Vulkan are vendor‑neutral APIs for compute and graphics. Choose the GPU that best matches your primary tools’ accelerations and includes sufficient VRAM for your project sizes.
Best‑fit quick picks:
- 1440p high‑refresh + Blender Cycles/OptiX: NVIDIA with 12–16GB+ VRAM.
- 4K raster‑first gaming + Vulkan workloads: AMD with 16GB+ VRAM.
Memory capacity and speed planning
For mixed gaming and creation, 32GB DDR5 is the sweet spot; 16GB still works but restricts heavy multitasking. Move to 64GB+ for large render datasets, 4K/8K timelines, or running VMs while gaming or streaming. Rendering memory context.
Definition (about 45 words): RAM is your system’s short‑term workspace. Large textures, timelines, and datasets live here while you work or play. When RAM runs out, data spills to disk—far slower—causing stutters and slowdowns. Size memory for peak workloads, not just averages, to keep performance smooth.
Tips:
- Enable EXPO/XMP.
- Favor two‑DIMM high‑frequency kits for stability on consumer boards.
Storage layout for speed and longevity
Use a fast NVMe SSD for OS, apps, and active projects, then add bulk storage for archives and backups.
- Primary: 1TB+ PCIe 4.0/5.0 NVMe. A PCIe 4.0 drive like the BiWin Black Opal NV7400 hits roughly 7,450 MB/s reads and 6,500 MB/s writes for snappy loads. Best‑builds context.
- Redundancy: consider RAID‑1 with 2×10TB HDDs for long‑term archives if needed. Archive strategy.
Definition (about 45 words): NVMe is a storage protocol that lets SSDs communicate over PCIe lanes directly, delivering much higher throughput and lower latency than SATA. It’s ideal for your OS, applications, and active projects. Use HDDs or a NAS for bulk archives, backups, and infrequently accessed footage.
Motherboard features that actually matter
Focus on the essentials for a hybrid workstation gaming PC blueprint:
- Correct socket/chipset, solid VRMs appropriate for your CPU.
- PCIe 4.0/5.0 GPU slot, at least two M.2 NVMe slots.
- 2.5GbE, Wi‑Fi 6/6E, rear USB‑C, and front USB‑C header.
Good examples:
- AM5 X670E: Asus TUF GAMING X670E‑PLUS WIFI, MSI MAG X670E TOMAHAWK WIFI, ASRock X670E Steel Legend.
- LGA1700 B760: MSI MAG B760 TOMAHAWK WIFI, Asus TUF GAMING B760‑PLUS WIFI. Motherboard shopping cues in PCMag’s guide.
If you’ll rely on integrated graphics temporarily, confirm the board has video outputs.
Power supply sizing and connector standards
Choose an 80+ Gold (or better) unit with ATX 3.1/PCIe 5.1 support and a native 12V‑2x6 cable to safely power current and next‑gen GPUs. For example, the ASRock Steel Legend SL‑850G is a Gold unit with ATX 3.1/PCIe 5.1 and native 12V‑2x6. PSU pick context.
12V‑2x6 (about 45 words): 12V‑2x6 is the newest high‑power GPU connector that replaces 12VHPWR. It improves pin contact and sense lines for safer, higher‑current delivery, reducing melting risks when fully seated. A PSU with native 12V‑2x6 simplifies cabling and supports today’s and tomorrow’s graphics cards.
Wattage guidelines (whole‑system targets):
- 650W: RTX 4060 / RX 7600 class
- 750W: RTX 4070 / RX 7800 XT class
- 850W–1000W: RTX 4080 Super / RX 7900 XTX class
- 1000W–1200W: RTX 4090 and heavy overclocks
Cooling strategy and acoustic targets
High‑core CPUs benefit from a 360mm AIO (e.g., NZXT Kraken 360). Large dual‑tower air coolers also work for mid‑high CPUs if your case airflow is strong. Ensure your chassis supports top‑mounted 360mm radiator clearance before buying. Case/radiator fit in best‑builds coverage.
Acoustic goals:
- Idle near‑silent, with conservative fan curves.
- Gaming under ~35 dBA where possible; use motherboard fan curves and quiet GPU BIOS modes when available.
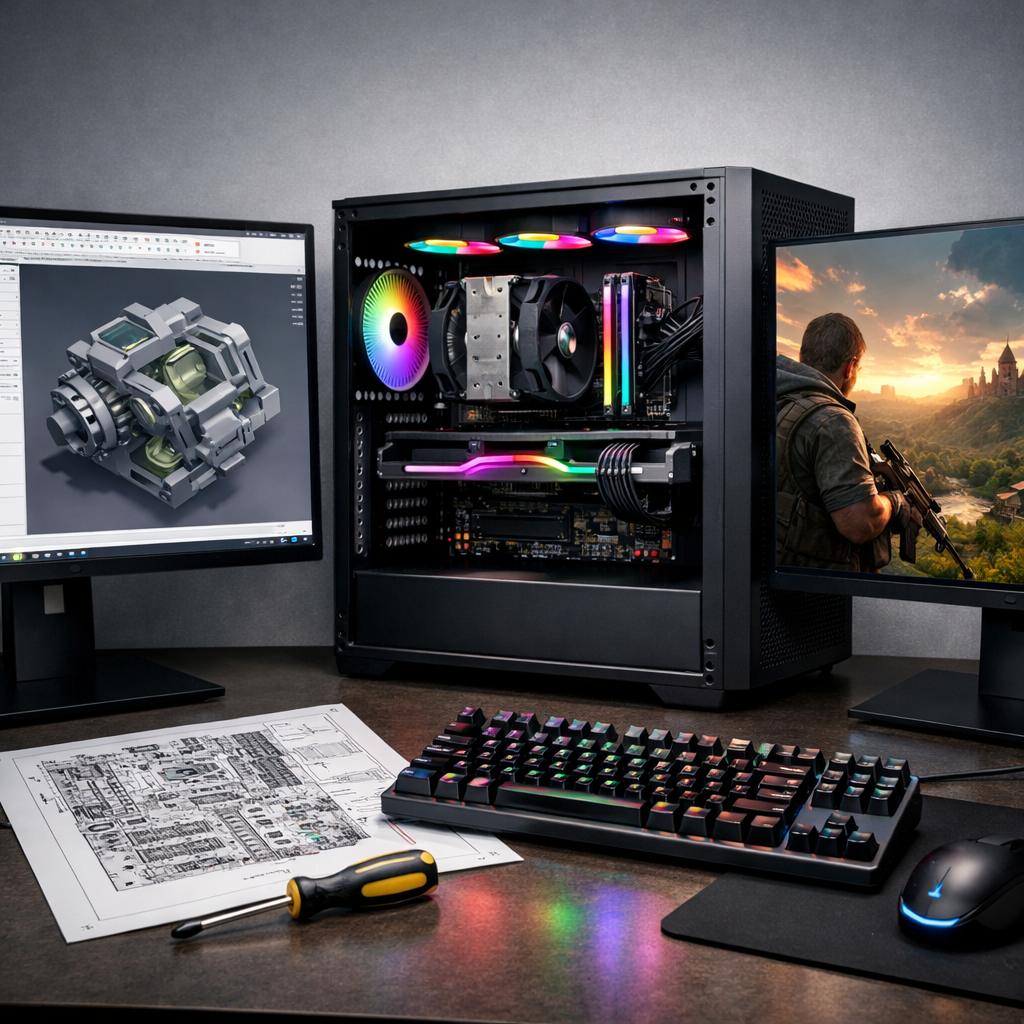
Case airflow, clearance, and cable access
Pick a chassis that’s easy to build in, cools well, and hides cables cleanly. The Lian Li Lancool 216 includes dual 160mm RGB front fans plus a 140mm rear exhaust, and supports a top‑mounted 360mm radiator—excellent airflow and straightforward routing. Case example in best‑builds.
Positive pressure (about 45 words): Positive pressure means slightly higher intake airflow than exhaust, which helps minimize dust entering through unfiltered gaps. Achieve it by running more intake CFM or slightly higher RPM on front fans than on rear/top exhaust, and by keeping the front panel unobstructed.
Check: GPU length, radiator thickness, and front‑to‑back cable channels with grommets before purchase.
Monitor and peripherals that unlock performance
Resolution/refresh pairings:
- 1080p/240Hz+ for esports and low latency.
- 1440p/144–240Hz for the best balance of sharpness and speed.
- 4K/120Hz for cinematic play and timeline clarity in creative apps.
Peripherals checklist:
- Color‑accurate monitor (calibratable) for creation.
- Wired, low‑latency mouse; mechanical keyboard with quiet switches for shared spaces.
- Closed‑back headphones for isolation; use reliable review outlets to shortlist models.
1440p vs 4K for gaming and work:
| Aspect | 1440p | 4K |
|---|---|---|
| Gaming performance | Higher FPS at given GPU power | Lower FPS; needs higher‑tier GPU |
| Visual clarity | Very sharp on 27–32" | Ultra‑sharp; ideal for 32"+ |
| Creation workflows | Good UI density and preview clarity | Excellent timeline/detail visibility |
| Hardware demand | Moderate | High (VRAM and GPU throughput) |
Software ecosystem and driver strategy
For maximum app support—3D design, DCC tools, and games—use Windows as your base OS. Creator stack context.
Setup steps:
- After Windows, install drivers from vendor sites: chipset, GPU, audio, then LAN/Wi‑Fi.
- Use Studio/Pro drivers when your apps certify them; keep Game‑Ready drivers for play‑only rigs.
- Centralize utilities and avoid redundant RGB/motherboard bloat.
- Validate parts and expectations with current best‑build and component hierarchy coverage. Reference builds.
RGB choices and cost tradeoffs
RGB looks great but adds cost and software complexity. RGB fans and RAM can inflate budgets and clutter cable runs; choose one ecosystem (motherboard control or a single‑brand hub) or go minimal for a cleaner build. The Lancool 216’s included RGB fans strike a sensible middle ground. Case example.
Tips:
- Pick one control layer to avoid conflicts.
- You can disable all lighting in BIOS for stealth builds.
Networking, ports, and external device planning
Checklist for smooth work and play:
- Onboard 2.5GbE plus Wi‑Fi 6/6E for flexible connectivity.
- Front USB‑C and ample rear 10Gbps+ USB ports.
- Display outputs to match your monitor (HDMI 2.1/DP 1.4+); if using an iGPU, confirm motherboard video outputs.
- Plan for capture cards, external SSDs, DACs, and docking needs.
Step‑by‑step build workflow
A fast, safe flow to minimize rework and cable mess. Keep a detailed written guide open for reference. Gaming Device Advisor checklists keep the process predictable. PC building basics
Preparation and compatibility checks
- Use a compatibility tool (e.g., a virtual parts list) before buying to avoid socket or clearance mismatches.
- Gather tools: magnetic Phillips bits, shaft extender for tight spots, zip/velcro ties; use your phone camera for close‑ups.
- Recheck choices with current build lists and reviews for any last‑minute swaps.
Board‑level install outside the case
- On a soft towel or the motherboard box, install the CPU, RAM, and M.2 SSDs first.
- Fit cooler backplate/brackets now for easier access.
- If you plan to boot on iGPU first, verify your motherboard has video outputs.
Case install, cabling, and airflow setup
- Mount the motherboard and PSU, then install the GPU.
- Route front‑panel, EPS, and PCIe cables before mounting radiators or the GPU if space is tight.
- Set front intake and top/rear exhaust airflow; confirm top 360mm radiator clearance if applicable.
- Keep cable runs behind the tray; favor velcro ties for serviceability.
First boot, BIOS updates, and drivers
- On first boot, confirm CPU/RAM/drives in BIOS; update BIOS to the latest stable revision.
- Install Windows, then drivers in order: chipset, GPU, audio, LAN/Wi‑Fi.
- Install only one RGB suite to avoid conflicts.
Validation, thermals, and stability tests
- Run stress tests and your real workloads to verify temps, stability, and balance; tune fan curves or revisit component choices if bottlenecks appear.
- Keep a current, detailed build walkthrough video handy for visuals. Step‑by‑step visual walkthrough
- Document baseline temps/FPS and set monitoring alerts for future changes.
Performance targets by resolution and workload
Set expectations so your parts meet both FPS and creation goals.
| Target use | Resolution/refresh | CPU priority | GPU class target | VRAM/notes |
|---|---|---|---|---|
| Esports | 1080p/240Hz | High single‑thread | Mid‑tier (e.g., 4060 Ti/7700 XT) | 8–12GB; latency‑optimized |
| Balanced AAA | 1440p/144–240Hz | Balanced cores + clocks | Upper‑mid (e.g., 4070 Super/7800 XT) | 12–16GB recommended |
| Cinematic AAA | 4K/120Hz | Adequate single‑thread | High‑end (e.g., 4080 Super/7900 XTX) | 16–20GB+ ideal |
Compute note: Rendering/encoding scales with cores and GPU accelerations (CUDA/OpenCL/OptiX); confirm your app’s supported APIs and versions to avoid surprises. Rendering support guide
Troubleshooting common build issues
- Quick checks: 24‑pin ATX, EPS CPU power, and GPU power fully seated; RAM firmly latched; M.2 standoff height correct; front‑panel headers correct; monitor cable on the GPU, not the motherboard.
- No display: clear CMOS, try one RAM stick, test iGPU output if available, re‑seat GPU and PCIe cable.
- Thermals: reapply paste, confirm fan orientation, ensure radiator exhaust clearance, and verify the pump on the correct header.
Smart upgrade paths and longevity tips
- Start with 32GB RAM and one NVMe; move to 64GB and add a second NVMe as projects grow.
- Choose PSUs and motherboards with ATX 3.1/PCIe 5.1 and extra M.2 to avoid early platform swaps. Future‑proof parts context
- Plan a GPU refresh every 3–4 years; evaluate CPU/motherboard when your core needs change. Remember many rely on workstation‑class PCs for 4–6 years.
Storefront strategy for day‑one gaming
- Pick platforms by title: check Steam, Epic Games Store, GOG, first‑party launchers, and PC Game Pass; verify regional pricing and cross‑save.
- Instant‑activation key marketplaces: understand how keys work, compare storefronts, check seller ratings and payment protections, and avoid deals that seem too good to be true.
- Day‑one checklist: confirm platform/region, verify edition bonuses, enable preloads, use reliable payment methods, and redeem keys immediately.
Gaming Device Advisor’s buying guides outline how to evaluate marketplaces and avoid pitfalls.
Frequently asked questions
Can a gaming PC double as a professional workstation?
Yes. With the right CPU core count, strong single‑thread speed, a GPU that supports your app’s compute APIs, and 32–64GB RAM, one PC can handle creative workloads by day and high‑refresh gaming by night. Gaming Device Advisor’s blueprint targets that balance.
How much RAM do I need for gaming and creative work?
Aim for 32GB as a versatile baseline (Gaming Device Advisor’s default). Step up to 64GB or more if you work with large 3D scenes, 4K timelines, or virtual machines while gaming or streaming.
Do I need NVIDIA for CUDA or will AMD work for my apps?
If your apps rely on CUDA/OptiX, choose a GPU that supports those frameworks; otherwise, options accelerated via OpenCL/Vulkan can offer strong value. Check your software’s acceleration matrix—Gaming Device Advisor’s guides link to the right resources.
Is PCIe 5.0 worth it over PCIe 4.0 today?
For GPUs, PCIe 4.0 is typically fine; many SSDs still see minimal real‑world gains beyond fast PCIe 4.0 drives. Gaming Device Advisor suggests choosing PCIe 5.0 primarily for future‑proofing if it doesn’t cut into your GPU budget.
What’s the safest way to buy new PC games and instant keys?
Buy from reputable storefronts and vetted key marketplaces. Gaming Device Advisor recommends confirming region, edition, and platform, checking seller ratings, enabling two‑factor authentication, and redeeming immediately.